LightWave 3D Earth Tutorial – Part 1

LightWave 3D model and render of the earth.

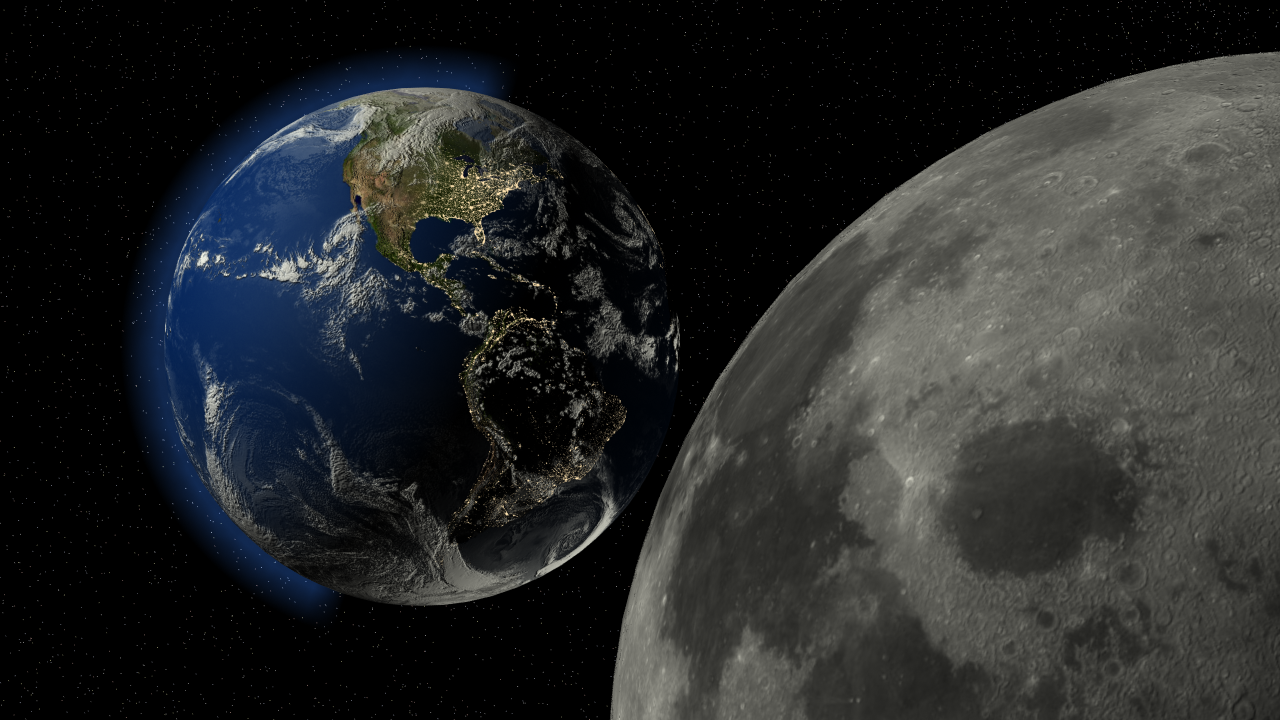
In this series of tutorials, I will show how I modeled and textured the Earth in the image above using LightWave 3D. The surfaces are primarily driven by image maps along with  some custom logic in the Node Editor.

You can download the images I used in my model in this zip file. The images are collected from a few online resources: Planet Pixel Emporium provided most of the images, and NASA helped with some others.

Continue reading “LightWave 3D Earth Tutorial – Part 1”

Earth and Moon

For the past week, I decided to work on a more photo-realistic render. A while back, I was entertaining myself by trying to render the Earth and moon in Maya. I never finished that scene, however, because I couldn’t find a good way to render out stars in Maya without using a static background image. Before I found a good solution in Maya, I got sidetracked and forgot about it.

I decided to translate the surfaces from Maya to LightWave, to try to stretch my abilities in the LightWave node editor. Here is my final result:

LightWave 3D render of the Earth and moon from space.

Continue reading “Earth and Moon”

Cowboy Bebop Warehouse Wrap Up

The last two weeks have been pretty hectic with the holidays and then getting caught up at work, so I never had a chance to finish touching up the Cowboy Bebop warehouse scene I was creating. But that’s OK, because I learned some good lessons from creating the scene, especially as it relates to building anime-style backgrounds in LightWave. The only touch up I wanted to try was adding a paintbrush effect to the walls, but I don’t expect I would use it very often since I tend to prefer cleaner renders. Plus, that would be something to create in Photoshop, not within LightWave itself, so I can push it off to another time, if I ever need it.

Here are the some of the lessons I learned while working on this scene:

Continue reading “Cowboy Bebop Warehouse Wrap Up”

Cowboy Bebop Background

I have continued working on my 3D representation of the Cowboy Bebop background.  I created a series of UV maps on the floor, walls, and some of the boxes.  I then created individual bump, diffuse, and color maps to mimic some of the features in the original scene.  I also tweaked the geometry since my last post, to fix some of the relative proportions of the different objects.

The first draft of my textured Cowboy Bebop scene (click for full size image).

Continue reading “Cowboy Bebop Background”

Another 3D Anime Background

Now that I finished recreating the FLCL background using LightWave 3D, I have started working on a second background. This time, I’m using a shot from Cowboy Bebop, my favorite anime. If you haven’t seen the show, get yourself a copy (or wait until it starts airing on Adult Swim again — they have been showing Cowboy Bebop since Adult Swim first started in 2001, because the series is that good).

Continue reading “Another 3D Anime Background”

LightWave 3D Super Cel Shader Replacement

If you ever wanted to render an object in LightWave 3D using a cel shaded (aka “toon shaded”) look, you probably considered using Super Cel Shader. LightWave 3D has included Super Cel Shader as part of the standard installation since version 5.5 (in the mid-1990’s).

Super Cel Shader is great because it is so easy to use. You can specify up to four brightness zones on your object based on the amount of diffuse light at each point, and specify a static color brightness to use for that zone. When the object is rendered, each zone will show up as a single color band on the object, creating a traditional cartoon-shaded effect.

Continue reading “LightWave 3D Super Cel Shader Replacement”

3D Anime Background – FLCL

A few weeks ago, I mentioned that I am working on creating anime-style backgrounds within LightWave. I was a little delayed on this side project by a small cold but I finally finished a draft of my first basic scene, which is the main character’s room from FLCL. You can view the reference image either in my original post or directly here.

This draft is as much as I plan on doing for this particular side project. My goal was to create techniques that will aid me in creating better backgrounds for traditional-looking animations, and I accomplished that goal.

FLCL Naota's Room
LightWave 3D render of a background scene from FLCL (click for full size image).

Continue reading “3D Anime Background – FLCL”

Simple Watercolor Texture in LightWave 3D

I’ve been working on additional models for my FLCL background recreation, so instead of showing updates to that scene I will show you the basics of my technique for creating watercolor-like textures.

Watercolors mix together in interesting ways, especially when layered. As this example image shows, the layered colors don’t just mix to form a uniform color; you can see bits of the color from underneath peaking out where the top color didn’t saturate the paper. My goal with my surface was to recreate that type of watercolor technique.

Continue reading “Simple Watercolor Texture in LightWave 3D”

3D Anime Backgrounds

I have been working on creating more stylized background renders from LightWave 3D using some techniques of my own design. The goal is to create backgrounds that fit better into traditional Japanese-style animation shows (anime).

I have made good progress but I still have a lot of work to perfect the new techniques. My current goal is to create a reasonable likeness of a background from the show FLCL (one of my favorite anime shows of all time, although it’s a bit surreal and probably nonsensical if you aren’t already interested in the genre). Here is the background I am trying to duplicate in LightWave:

Continue reading “3D Anime Backgrounds”